Partial Classes and Methods with an example in C#.NET
- By Gurunatha Dogi in C#
- Oct 6th, 2014
- 23968
- 0
Introduction
Hey Friends..! Happy October 2014 to everyone. In this article we will understand about partial classes and partial methods in C#.NET. We will also see advantages of using partial classes in real time scenario (Like Splitting classes, Auto-generation code i.e. [Webforms and LINQ-SQL DBML]). Each and every part about partial classes is explained as step by step manner.
If you guys have suggestion in improving this topic or improving this article then yes you are most welcome to @onlinebuff website because your suggestions and your knowledge will help onlinebuff readers to enhance their expertise in c-sharp programming. If you want to share your knowledge via this blog or this article then kindly drop a mail. Gurunatha.D happy to see you at onlinebuff. If you have any comment then kindly drop it in the below comment section.
About C# Partial Classes

In a single one-liner of definition : A partial class in c-sharp.net splits the definition of a class, an interface or a struct into two or more source files. The complete same-class code is gets separated into two or more parts. These separation is only applied when we use "partial" keyword to a class, an interface or a struct. This separation is further gets combined on CLR when an application or a project is compiled / during compilation of code.
Syntax of Partial Classes
To define a partial interface, class or struct we need to use partial keyword modifier before defination of a struct, class or an interface.
Partial Class
public partial class Program
{
 //Code goes Here
}
Partial Interface
partial interface IInterface
{
 //Code goes Here
}
Partial Struct
public partial struct strStruct
{
  //Code goes Here

}
Step by Step example of Partial Classes
Now that you have understood defination and syntax of a partial class. Let's understand how the partial class splits a class and combines during compilation. We will demonstrate this example in a console application.
Step 1 : Create a Console Application
First create a console application project.
Step 2 : Add Class File
After creating console application project add two class files i.e .cs files as shown in below image file.

Step 3 : Add Partial Keyword and Class-Name
After creating two different c-sharp files let's declare a single class name and partial modifier in both files.
In Class1.cs File
public partial class clsMAths
{

}
In Class2.cs File
public partial class clsMAths
{

}
Step 4 : Adding methods
After creating partial class "clsMAths" in two files. Let's add some methods.
In Class1.cs File
public partial class clsMAths
    {
        public void Add(int k, int l)
        {
            Console.WriteLine("Output is {0}", k + l);
        }

        public void Sub(int k, int l)
        {
            Console.WriteLine("Output is {0}", k - l);
        }
    }
In Class2.cs File
 public partial class clsMAths
    {
        public void Mul(int k, int l)
        {
            Console.WriteLine("Output is {0}", k * l);
        }

        public void Div(int k, int l)
        {
            Console.WriteLine("Output is {0}", k / l);
        }
    }
Step 5 : Display Output
Now let's create a object of class "clsMAths" in the main program of a console application and call the respected class methods.
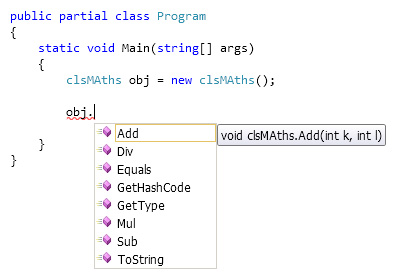
As you see friends from above snapshot the moment we have created an object of that class "clsMAths" .Net Framework automatically combined both partial classes in different CS file under same namespace. So now we can see all methods in a single object.
static void Main(string[] args)
        {
            clsMAths obj = new clsMAths();

            obj.Add(5, 4);
            obj.Sub(27, 9);
            obj.Mul(9, 3);
            obj.Div(72, 2);


        }
Output
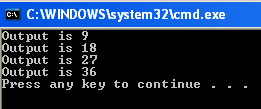
Conclusion : So from above demonstration it is been proved that when we create two or more files with partial classes and hit the compile button internally .NET Framework merges these partial classes into a single class and hence you can see all methods under a single object.
In the above example of code you have seen the use of partial classes to split the class code into two or more files for better maintainence but this is not just a use of partial class to maintain only class-code there are other ways of maintaining class code via visual studio tools.
So the main advantage of using partial classes when we are working with an autogeneration of code.
Partial Class Auto Generation Code
What is an auto generated code : A code which generates dynamically when any updates occurs on the UI screen.
The best and simple example to see an auto generated code in present while we are working with an web application in c# asp.net as shown in below snapshot.

As you saw the moment we have created a web application for an every .aspx file it has created a business logic code (i.e. behind code) and designer code (UI behind code).
If you open these files you can see in designer.cs file we have partial class "Default" and in behind code file we have same partial class "Default".
The moment we add any button on UI screen it automatically generates a button code in a desinger file as shown below.
Designer.cs File
 public partial class _Default {

        /// summary
        /// Button1 control.
        /// summary
        /// remarks
        /// Auto-generated field.
        /// To modify move field declaration from designer file to code-behind file.
        /// remarks
        protected global::System.Web.UI.WebControls.Button Button1;
    }
Behind code default aspx file
public partial class _Default : System.Web.UI.Page
    {
        protected void Page_Load(object sender, EventArgs e)
        {

        }
    }
So partial classes are very useful while we are working an auto generation of a code.
Let me show you another important example of an auto generation code which uses partial classes.
Partial Classes in LINQ to SQL DBML Files
In LINQ to SQL DBML demonstration we will see how partial classes are useful.
Step 1 : Create a Empty Website
First create a empty website and give appropriate name to it.
Step 2 : Add WebForm
Add aspx webform to an empty website.
Step 3 : Add Gridview
Drag and drop a gridview to a empty website.
Step 4 : Add LINQ to SQL DBML File
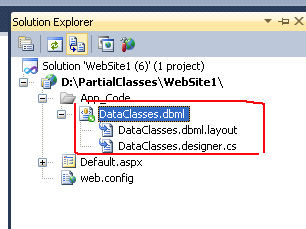
In this step go to solution explorer right click and add new item. In the New Item add a new file called LINQ to SQL DBML File.
Step 5 : Select Database and Datatable
Create database and data-table then drag and drop that table to a dbml file. Kindly add some dummy data in this demonstration. It is best and easy to understand if you create a same table with same column names as shown below.

We have successfully added a new customer table to dbml file.
The moment we have added new data-table .net framework automatically regenerated the designer code file of DataClass dbml file. As shown in below in image.
public partial class Customer : INotifyPropertyChanging, INotifyPropertyChanged
{

	private static PropertyChangingEventArgs emptyChangingEventArgs = new PropertyChangingEventArgs(String.Empty);

	private int _customer_id;

	private string _customer_name;

	private string _customer_address;

	private string _customer_country;

	private string _customer_city;

	private string _customer_pincode;


}
So as you saw .NET automatically added a partial class Customer to a designer file.
If you closely look at the above source code it has mapped database table columns to class property.
So now the main advantage of having partial class is that suppose if we want to add a new column/new property to partial customer class then we can do that by creating a new partial class without affecting the .NET framework regenerated code.
Step 6 : Adding New Data Column
Let's add a new property to a newly created partial class "Customer" as shown in below snippet of code.
 public partial class Customer
	{
        public string TodayDateTime
        {
            get { return DateTime.Now.ToString("MM/dd/yyyy h:mm tt"); }
        }
	}
As you saw from above snippet of code we have added a new property "TodayDateTime".
Step 7 : Display Output
Previously we have added a gridview to a default aspx page let's display output in gridview.
Kindly Note : Since we are using to LINQ DBML so to fetch records we need to use LINQ query.
The complete source code snippet is shown below of a default aspx file. In further upcoming articles we will definately cover LINQ and LINQ queries separately.
protected void Page_Load(object sender, EventArgs e)
    {
        DataClassesDataContext objcontext = new DataClassesDataContext();

        var query = from customer in objcontext.GetTable()
                    select new
                    {
                        customer.customer_id,
                        customer.customer_name,
                        customer.customer_address,
                        customer.customer_country,
                        customer.customer_city,
                        customer.customer_pincode,
                        customer.TodayDateTime

                    };
        var content = query.ToList();
        GridView1.DataSource = content;
        GridView1.DataBind();


    }
Output

Conclusion : So from examples we have seen partial class is not only help to split the class code but also useful while working with some auto generated code like Webform, LINQ to SQL, Entity Framework etc.
Advantages of Partial Class
Multiple developers or more developers can work together in implementation of a class but in a different files.
Partial Classes are useful while working auto generated code's like LINQ to SQL, Entity Framework, Webforms etc. Anytime we can inject our custom validation logic or business logic using partial class.
Maintainence of an application will be much more easier by separating larger classes into small ones.
Key Factor while working with Partial Classes
Partial keyword is must while implementing partial classes.
Partial classes must be declared or defined under same namespace or same project. If it declared out of scope of project or under other namespace then it will not work.
Class-name should be same while implementing partial classes
Accessibility Level : All partial class groups must have same access modifier (eg. private, public or protected).
Sealed Modifier : If any part of partial class is used with sealed modifier then entire group will be sealed.
Abstract Modifier : If any part of partial class is used with abstract modifier then entire group will be abstract class.
Partial Methods in C Sharp with example
Partial methods is a feature introduced in .Net framework 3.0. Implementing partial methods is pretty simple. Partial methods can be defined in partial classes only and partial methods can have only one implementation or no implementation but it can have definations.
To define partial methods it is compulsary to have partial keyword before method name as shown in below code.
public partial class clsCustomer{

 partial void Details();


}

//In another class file

public partial class clsCustomer{

 public partial void Details(){
   Console.WriteLine("Printing Details...!");
 }

}
As you saw friends from above code example that we can have only one implementation of a partial method or no implementation (only defination).
So this is all about partial classes and partial methods in c#.net if you have any doubts or query or suggestion or feedback to improve this article kindly drop your valuable comment in the below comment section.
We will really appreciate if you want to suggest us any topic or question for writing articles onlinebuff then feel free to send your mail to Mr.Gurunatha.D.
If you find this article helpful then please share it with your friends on Facebook, LinkedIN, Twitter, Google+...Thank You!

Gurunatha Dogi
Gurunatha Dogi is a software engineer by profession and founder of Onlinebuff.com, Onlinebuff is a tech blog which covers topics on .NET Fundamentals, Csharp, Asp.Net, PHP, MYSQL, SQL Server and lots more..... read more
Add a Comment

- By Gurunatha Dogi
- Aug 24th, 2014
- 40161
- 0
Understand difference between Early Binding and Late Binding with an example in C#
- By Gurunatha Dogi
- Aug 10th, 2014
- 16546
- 0
Complete Tutorial on C# 3.0 VAR Keyword with example
- By Gurunatha Dogi
- Aug 7th, 2014
- 17127
- 0
Complete Tutorial on Dynamic Keyword in C# 4.0 with an example
- By Gurunatha Dogi
- Aug 4th, 2014
- 35964
- 0