:: SHARE THIS POST ::
Home Recently Published Articles
Hey friends..!This is document is completely dedicated to an interactive google maps using Google Maps API v3. We have recently got 10 to 15 emails asking onlinebuff to write a tutorial blog on google maps. So thanks to all our visitors for dropping your valuable mails we truly appreciate it. So as per your mails we have posted this tutorial post on google maps. We have covered every topic of maps api with step and step easy to understand examples using html javascript samples and infographics.

The tutorial blog is designed in HTML and javascript object oriented programming concepts. So this document designed only for programmers who already knows javascript, jquery, html very well. So we expect Javascript+HTML knowledge must to implement google maps in your website. If you still want to learn javascript then see for: w3schools. Personally found useful website for learning javascript and HTML.
IntroductionHello Audience...! Welcome to tutorial of google map using Javascript Google Maps API v3. In this tutorial we will learn how to integrate map in our website and how to customize events, controls, styles and map types as per our requirement. Step by step Gurunatha.Dogi tried his best to explain every example of google map. The document is designed in such a way that it let you to start quickly exploring, integration and developing applications of google map for your website. For more reference your check this google map link : Google Maps API Reference.
There are few steps to be taken before you start integrating map in your website. Since you will be integrating google-map for free so it is compulsary to load map api using an API key.
Kindly Note : There is no charge of using google maps api or google maps. If you website generates 25,000 or more map loads each day for more than 90 successive days then go with Google Maps API for Work license. Google Maps API for Work its a paid version where you can get unique information in more insightful, actionable ways. For enterprise edition of google map see here : Google Map Enterprise.
In this complete tutorial we have used the free version of google maps api with api key. Below step is especially for those who want to use google maps for free using an api key.
Creation of a google map api is pretty simple. First visit this url : https://code.google.com/apis/console. This url ask your login details compulsary we need a google account or gmail account to login into google apis console program.
Once you login it will prompt to create a new project as shown in below image.

Click on the create project button to create a new api project. After you click on the create project button a screen will display where you can find list of google products apis from that list you need to find Google Maps JavaScript API v3. On the right-hand side you will find a OFF button just click on that once you click on that button a popup jquery window will open as shown in below image.
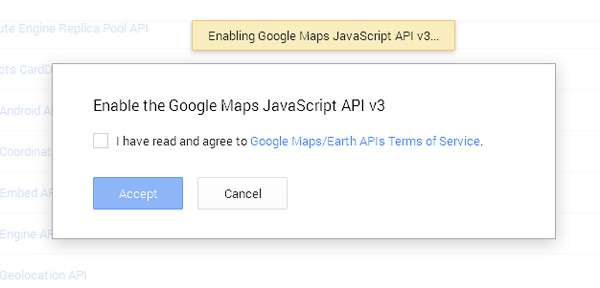
Accept the terms and conditions of google maps api v3 and click on accept button. It will take few 20 sec to 30 sec to enable the service. On the same screen go on the top you will find your enabled apis. Now on the left-hand side of a web page find menu "API & auth" under that sub-menu find "Credentials". Click on that link a screen will appear with two topics "OAuth" and "Public API access".
Next step click on "Public API access" button a jquery fancy popup will appear as shown below.

Select "Browser Key" and enter your domain-name under "Accept requests from these HTTP referers (web sites)" like "https://www.onlinebuff.com" and do not enter anything finally click on "Create" button to create an API key as shown in below image.

As you see friends, we successfully created an API key for onlinebuff.com. The same-way you can also create a key for your website. Kindly Note : The UI screen of google may change or update as the time-passes but terminology will not change. You find or create an api key by finding the terminology as we shown in above example. If any help is needed do not forget to drop your valuable comments/feedbacks in the below comment box.
So we are done with our API key code. So now lets create a simple example of google map.
In the above step we have successfully created the MAP API key now let's use that key and create a simle basic map (Load basic map).
Step 1 : Import Javascript using API Key
<script src="https://maps.googleapis.com/maps/api/js?key=AIzaSyDMxlH8RXNbwffNYGbxsBhsmByhu-e1MOY&sensor=false"></script>
Place this above script in the head section of the HTML file.Now in the next step let's create a javascript function to load map.
<script type="text/javascript">


    var map;

       function LoadMAP() {

         var mapOptions = {
           zoom: 12,
           center: new google.maps.LatLng(18.9750, 72.8258)
         };

         map = new google.maps.Map(document.getElementById('map-load-div'),mapOptions);
       }

    google.maps.event.addDomListener(window, 'load', LoadMAP);


    </script>
As you saw in our above script code we have created a "LoadMap()" inside that we have set some map options like value of map zoom and center point the point which we want to show on our map and to do that we have included Latitude and Longitude points. How to obtain Latitude and Longitude points via address-name or place-name we will see in the further part of an article.
After setting up Latitude and Longitude points we setup the map to the HTML tag attribute "ID" name as "map-load-div".
Finally loading the map on windows page load by using an event "addDomListener". The complete code example is shown below.
<!doctype html>

<html lang="en">
<head>
    <title>Example of Simple Basic Google Map - Onlinebuff.com</title>


    <script src="https://maps.googleapis.com/maps/api/js?key=AIzaSyDMxlH8RXNbwffNYGbxsBhsmByhu-e1MOY&sensor=false"></script>

    <script type="text/javascript">


    var map;

       function LoadMAP() {
         var mapOptions = {
           zoom: 8,
           center: new google.maps.LatLng(18.9750, 72.8258)
         };

         map = new google.maps.Map(document.getElementById('map-load-div'),mapOptions);
       }

    google.maps.event.addDomListener(window, 'load', LoadMAP);


    </script>
</head>
<body>
    <div id="map-load-div" style="width:631px;height:420px;margin-left:15px;"></div>
</body>
</html>
If you wish to load a map data in any specific preferred language as supported by Google Maps then you can do that by adding simple optional language parameter to the google map api in the script tag as shown in below snippet of code.
<script src="https://maps.googleapis.com/maps/api/js?key=AIzaSyDMxlH8RXNbwffNYGbxsBhsmByhu-e1MOY&sensor=false&language=hi"></script>
The above script will load map data in "HINDI" language (INDIAN Language).
Click Here to View Live DemoAlso see other supported languages in google map : Supported Languages in Google Map
By default without latitude and longitude the map loads to a region The United States. If you wish to alter this and set it to your specific region then you need add an optional parameter "region" to api as shown in below code.
<script src="https://maps.googleapis.com/maps/api/js?key=AIzaSyDMxlH8RXNbwffNYGbxsBhsmByhu-e1MOY&sensor=false®ion=IN"></script>
The above script will set the map to Indian region.
Google has provided a list of supported UI events designed to respond to user events. There events are very useful to respond to user activity on the map. Let's say if a user click somewhere on the map you can fire a click event to show some messages or infowindow. All these below events are supported in the google map api version v3. Practical use of these events we will see in the further part of an article.
Placing a marker on a map is pretty simple just you need a position of a location and to get that position you simply need a latitude and longitude points and also you need to use Marker event function as shown in below example of code. Marker function of a google map api creates its own default red marker on the given position. Finally we need to call setMap() method of a Marker class to set marker on map.
 var map;
    var myCenter;
       function LoadMAP() {

	     myCenter=new google.maps.LatLng(18.9750, 72.8258);
         var mapOptions = {
           zoom: 8,
           center: myCenter
         };

         map = new google.maps.Map(document.getElementById('map-load-div'),mapOptions);

         ///Marker Script is Here
		 var marker = new google.maps.Marker({
		  position: myCenter,
		  title:'Click to zoom'
		 });
          marker.setMap(map);

		  ///Marker Script is Here

       }

google.maps.event.addDomListener(window, 'load', LoadMAP);
In the above example you have seen how to create a marker on the map. Now you have a seen marker in red downward pointed. If suppose you want to change that marker to your custom marker then you can do that by using Marker property "icon" or Marker method "setIcon()". Here below we will see another example where we use our own custom marker and on hover we will update that marker to new one and for mouseover effect we will use "mouseover" event .
 var map;
    var myCenter;
       function LoadMAP() {

	     myCenter=new google.maps.LatLng(18.9750, 72.8258);
         var mapOptions = {
           zoom: 13,
           center: myCenter
         };

         map = new google.maps.Map(document.getElementById('map-load-div'),mapOptions);

		 var marker = new google.maps.Marker({
		  position: myCenter,
		  icon: "gmapicons/mainmark.png",
		  title:'Click to zoom'
		 });

		 marker.setMap(map);

		  google.maps.event.addListener(marker,'mouseover',function() {
		  marker.setIcon("gmapicons/mainmark1.png",this);
		  });


       }

    google.maps.event.addDomListener(window, 'load', LoadMAP);
In the above example we have used custom marker instead of google marker and on mousehover we just updated the marker to new icon.
How to create Infowindow
In the above example we have created a marker but only pointed marker does not look good we need to give some information to the user Like : You are this place, so to do this we will use "InfoWindow" function of a google map api to display infowindow on a marker. "InfoWinodw" event function helps us to create a info popup window on marker with content on map.
 var map;
    var myCenter;
       function LoadMAP() {

	     myCenter=new google.maps.LatLng(18.9750, 72.8258);
         var mapOptions = {
           zoom: 13,
           center: myCenter
         };

         map = new google.maps.Map(document.getElementById('map-load-div'),mapOptions);

		 var marker = new google.maps.Marker({
		  position: myCenter,
		  icon: "gmapicons/mainmark.png",
		  title:'Click to zoom'
		 });

		 var infowindow = new google.maps.InfoWindow({
		  content:"Hello OnlineBuff"
		 });
		 infowindow.open(map,marker);

		 marker.setMap(map);

		  google.maps.event.addListener(marker,'mouseover',function() {
		  marker.setIcon("gmapicons/mainmark1.png",this);
		  });

          google.maps.event.addListener(marker,'click',function() {
          marker.setIcon("gmapicons/mainmark.png",this);
		  infowindow.open(map,marker);
		  });


       }

    google.maps.event.addDomListener(window, 'load', LoadMAP);
In above code example we have displayed the infowindow and infowinfow message on map load and again on click event we have opened that same infowindow with different icon.
How to fetch Latitude and Longitude from Address
This is more interesting question till now you have in our examples we have used pre-defined LAT and LONG. Here in this example we will show you how to fetch LAT and LONG from an address name or place name. To fetch that we will use one of google map api event function called "Geocoder()". "Geocoder()" helps us to retrive LAT and LONG from a place-name. An example is shown below.
 var map;
    var myCenter;
	var geocoder = new google.maps.Geocoder();
	var address = "Malabar Hill, Mumbai";
	var latitude;
    var longitude;

       function LoadMAP() {


		  geocoder.geocode({'address': address}, function(results, status) {

			  if(status == google.maps.GeocoderStatus.OK) {

				   latitude = results[0].geometry.location.lat();
				   longitude = results[0].geometry.location.lng();


		  myCenter=new google.maps.LatLng(latitude, longitude);
         var mapOptions = {
           zoom: 13,
           center: myCenter
         };


         map = new google.maps.Map(document.getElementById('map-load-div'),mapOptions);

		 var marker = new google.maps.Marker({
		  position: myCenter,
		  icon: "gmapicons/mainmark.png",
		  title:'Click to zoom'
		 });

		 var infowindow = new google.maps.InfoWindow({
		  content:"Hello Malabar Hill..!"
		 });
		 infowindow.open(map,marker);

		 marker.setMap(map);

		  google.maps.event.addListener(marker,'mouseover',function() {
		  marker.setIcon("gmapicons/mainmark1.png",this);
		  });


		 }

		   });

       }

    google.maps.event.addDomListener(window, 'load', LoadMAP);
As you see in our above example we used "Geocoder" event to get the LAT and LONG from a address-name. The above address-name can be set from php $_GET or $_POST variable-name if you use html form with address field.
How to get Direction Route From Source To Destination
In this example we will show you how to take direction route means a route from source place to distance place and this route is decided depending on travel mode i.e. WALKING, DRIVING, BICYCLING and TRANSIT.
To do this example we will use "DirectionsService()" event of google map api which allows us to use source point and destination point with travel mode. To display the travel mode path we have used another event function "Polyline()". A complete example is shown below
    var map;
    var Origin=new google.maps.LatLng(19.1190, 72.8470);
	var Destination=new google.maps.LatLng(19.1550, 72.8500);
	var polyline=new google.maps.Polyline({strokeColor:"#cc6600",strokeWeight:2});
	var directionsDisplay;
	var directionsService = new google.maps.DirectionsService();

       function LoadMAP() {

	     directionsDisplay = new google.maps.DirectionsRenderer();

         var mapOptions = {
           zoom: 13,
           center: Origin
         };


         map = new google.maps.Map(document.getElementById('map-load-div'),mapOptions);


		  var requestcrt = {
			origin:Origin,
			destination:Destination,
			travelMode: google.maps.TravelMode.WALKING
    	  };


			  directionsService.route(requestcrt,function(responseey,statusey){

				 if(statusey==google.maps.DirectionsStatus.OK){

                    directionsDisplay.setOptions({polylineOptions:polyline});
				    directionsDisplay.setDirections(responseey);
				 }

			  });

			directionsDisplay.setMap(map);

       }

    google.maps.event.addDomListener(window, 'load', LoadMAP);
How to change Direction Route from Travel Mode Source To Destination
In the above example you seen how to create a direction route from source to destination. Now to change a travel mode of a direction route you just need to update parameter "travelMode" and you can set "travelMode" parameter to any of this value : WALKING, DRIVING, BICYCLING and TRANSIT
          var requestcrt = {
			origin:Origin,
			destination:Destination,
			travelMode: google.maps.TravelMode.DRIVING
    	  };


			  directionsService.route(requestcrt,function(responseey,statusey){

				 if(statusey==google.maps.DirectionsStatus.OK){

                    directionsDisplay.setOptions({polylineOptions:polyline});
				    directionsDisplay.setDirections(responseey);
				 }

			  });

			directionsDisplay.setMap(map);
          var requestcrt = {
			origin:Origin,
			destination:Destination,
			travelMode: google.maps.TravelMode.BICYCLING
    	  };
Draw Shapes on Google Map
The available drawing shapes on google map is Polyline, Polygons, Circles, Rectanges. We can draw all these shapes on the map. Here in this example we will see how to draw a circle shape on google map for 3km of radius from the position of LAT and LONG.
       var map;
	   var myCenter=new google.maps.LatLng(19.1550, 72.8500);

       function LoadMAP() {

	     directionsDisplay = new google.maps.DirectionsRenderer();

         var mapOptions = {
           zoom: 13,
           center: myCenter
         };


         map = new google.maps.Map(document.getElementById('map-load-div'),mapOptions);

		 var mycircle = new google.maps.Circle({

			center: myCenter,
			radius: 3500,
			strokeColor: "#5D8DFC",
			strokeOpacity: 0.8,
			strokeWeight: 1,
			fillOpacity: 0.1,
			map: map

    	});

       }

       google.maps.event.addDomListener(window, 'load', LoadMAP);
To create a custom zoom control is pretty simple process first we need to disable "scrollwheel" then we need to use png, svg icon and need to set that zoom icon to map.control. Here need some css knowledge and zoom icons.
<style type="text/css">

#joe-zoom-in, #joe-zoom-out {
  height: 32px;
  width: 32px;
  cursor: pointer;
  margin-left: 7px;
  background-color: #1169ad;
  background-repeat: no-repeat;
  background-size: 32px 64px;
  background-image: url("gmapicons/zoomcontroller.svg");
}
#joe-zoom-in:hover, #joe-zoom-out:hover {
  background-color: #F90404;
}


#joe-zoom-in {
  background-position: 50% 0;
  margin-top: 10px;
  margin-bottom: 1px;
}

#joe-zoom-out {
  background-position: 50% -32px;
}

</style>
var map;

	var myCenter=new google.maps.LatLng(19.1550, 72.8500);

       function LoadMAP() {

	     directionsDisplay = new google.maps.DirectionsRenderer();

         var mapOptions = {
           zoom: 13,
		   scrollwheel:false,
		   disableDefaultUI:true,
           center: myCenter,
		   mapTypeId:google.maps.MapTypeId.ROADMAP
         };


         map = new google.maps.Map(document.getElementById('map-load-div'),mapOptions);

		 mapzoomControlDiv = document.createElement('div');

  		 MapZoomControl(mapzoomControlDiv, map);

         map.controls[google.maps.ControlPosition.LEFT_TOP].push(mapzoomControlDiv);

       }


function MapZoomControl(controlDiv, map) {

	var controlUIzoomIn= document.getElementById('joe-zoom-in'),
            controlUIzoomOut= document.getElementById('joe-zoom-out');


	  	controlDiv.appendChild(controlUIzoomIn);
	  	controlDiv.appendChild(controlUIzoomOut);


	google.maps.event.addDomListener(controlUIzoomIn, 'click', function() {
		map.setZoom(map.getZoom()+1)
	});
	google.maps.event.addDomListener(controlUIzoomOut, 'click', function() {
		map.setZoom(map.getZoom()-1)
	});
}


    google.maps.event.addDomListener(window, 'load', LoadMAP);
How to find Places within the radius of selected location
In this example we will find places like school, banks, atms, restaurants from selected point and within radius of selected point. To do this example we will use google maps PlacesService() event.
Before we start coding of near by places we need to request for "libraries" = "places" to google map api.
<script src="https://maps.googleapis.com/maps/api/js?key=AIzaSyDMxlH8RXNbwffNYGbxsBhsmByhu-e1MOY&sensor=false&libraries=places"></script>
After calling optional parameter libraries to places its time to you use PlacesService event method in the LoadMap.
In this demonstration we will find school within the radius of 3km from the center position of LAT and LONG and what ever schools are found with 3km radius we have created respected markers for the same with the info content. Info Content is been added on click event so to check info content click on the markers.
  function LoadMAP() {

	     directionsDisplay = new google.maps.DirectionsRenderer();

         var mapOptions = {
           zoom: 13,
		   scrollwheel:false,
		   disableDefaultUI:true,
           center: myCenter,
		   mapTypeId:google.maps.MapTypeId.ROADMAP
         };


         map = new google.maps.Map(document.getElementById('map-load-div'),mapOptions);

		 mapzoomControlDiv = document.createElement('div');

  		 MapZoomControl(mapzoomControlDiv, map);

         map.controls[google.maps.ControlPosition.LEFT_TOP].push(mapzoomControlDiv);

		 var marker = new google.maps.Marker({
		  position: myCenter,
		  title:'Click to zoom'
		 });
		 marker.setMap(map);

		  infowindow = new google.maps.InfoWindow();
		  requestyt = {
			location: myCenter,
			radius: 3000,
			types: [defaultnearby]
		  };


		 service = new google.maps.places.PlacesService(map);

         service.nearbySearch(requestyt,function(results,status){callback(results,status,defaultnearby)})


       }


function callback(results, status, place_name) {

  if (status == google.maps.places.PlacesServiceStatus.OK) {
    for (var i = 0; i < results.length; i++) {
      createMarker(results[i],place_name);
    }
  }
}


function createMarker(place,place_name) {

  var placeLoc = place.geometry.location;
  var icon2 = "gmapicons/"+place_name+"_hover.png";
  var iconnr = "gmapicons/"+place_name+".png";
  var markerey= new google.maps.Marker({
    map: map,
    icon: "gmapicons/"+place_name+".png",
    position: placeLoc
  });

   google.maps.event.addListener(markerey,"click",function(){

     var infoContentesy=place.name;

    infowindow.open(map, markerey);
    infowindow.setContent(infoContentesy);


   });


}
Complete Example : All in One
This is the complete example of google map where we have implemented all above elements together under single map.
So friends, I hope you have enjoyed the session of google maps, I hope that you are well versed in implementing google maps in your website. Our document is not fully covered all the aspects of google maps but we tried our best to cover important topics of map. In future if anything new updates comes for google-map surely we will update that topic in the same document. If you have any doubts or help regarding this document kindly free-feel to drop your valuable comment in the below comment section. Just do me a help of sharing this article to your friends on your social media channels.
If you found this document useful then please dont forget to share with your friends on FB, twitter, Gplus, linkedin.Thank you..!
All fields marked with * are mandatory
Posted by Bhavesh ranpariya on 2016-05-23
INCREDEBLE...
Posted by Allwyn on 2016-05-10
Nice article sir
About The Author

Gurunatha Dogi is a software engineer by profession, works on programming languages like php, mysql, c#, dotnet, asp.net, sql server, jquery, search engine optimization, html and css tips and tricks, internet marketing. Apart from programming/coding, He loves blogging and playing guitar... About me page